Showing posts with label DIY. Show all posts

Saturday, 29 April 2023

Bank Hol DIY

As ever, today started with a trip to the DIY shop. And then it was followed up with another trip a couple of hours later.

I went out to get pipe supplies so that we could finish plumbing in the sink and get the dishwasher functional.

But before all that, the worktop needed fixing together. Hence the second trip to get some sealant/glue to bond the mitre joints together.

The worktop sections are bolted together from underneath so the whole worktop needed suspending in mid-air. This was achieved using books and plastic drawers.


We put three lines of sealant on the joint then bolted them together. Bashing the worktops periodically with a mallet to get them aligned vertically (i.e. trying to have no step between the two sections).


Once assembled, the whole worktop needed to be lowered into place. Except that's too easy. No, we had a windowsill to contend with. So one end had to be lifted up so that the worktop could clear the windowsill. Doing this without snapping the worktop at the point where the hob hole is meant that we had to take it steady, slowly increasing the piles of strategically placed towers of books. Then, once below the windowsill, steadily lowering back down. Slow, careful work, but well worth it.

Then we turned our attention to the dishwasher. This didn't sit far enough back and I wasn't sure why. Turns out that the socket cover for the hob power was pressed up against the insulation on the back of the dishwasher. So that got cut out and, low and behold, it now goes all the way back. This means that the dishwasher door will be flush with the ovens. Result!


So that the dishwasher could be hooked up to the pipes, we needed to get the hob unpacked and wired in.

I dutifully followed the wiring diagram and installation instructions but when we switched the power back on, the hob didn't come to life. Troubleshooting this is beyond my equipment so we just finished installing the hob. This meant that the sides of the adjacent cupboards needed lowering to accommodate the hob. Since this wasn't going to be seen, I just free-hand cut it with my multi-tool. Rough and ready but it did the job.


Then the moment of truth was upon us. What would happen with the dishwasher slid under the hob? Would there be enough of a ventilation gap? Would the cable for the dishwasher need embedding in its insulation?

Well, it wouldn't fit under the left side of the hob. So all of the cupboards are going to have to go 5mm higher. But that, along with the answers to my questions, will have to be another day.


SO CLOSE!!!


Sunday, 23 April 2023

Stretching the meaning of the word 'finish'

Yes, it's another day where I attempt to finish something that I'd hoped to finish the day before.

Today was the day I drilled through the outside wall. 

First job was to figure out where on the wall I needed to drill and at what angle. I cut away some of the plasterboard, marked the position and drilled a pilot hole using my new massive drill bit.


Then I moved outside, to drill the main hole. I had bought a special drill bit yesterday that would cut a core out of the brick at the right diameter for the waste pipe (a 52mm hole for a 40mm pipe). My main concern was that I was using a standard drill, not one with a clutch. According to the internet, this was a huge safety hazard - if the drill bit got stuck, the drill would yank in an anticlockwise direction, potentially breaking my wrist in the process. Also according to the internet, I expected this job to take at least an hour - probably more as I'd be taking it steady so as not to destroy my favourite wrist.

As it turned out, the brick cut like butter, taking only 20 minutes max, and my wrist was unscathed. I have no way of knowing if this was simply luck but it's done now and looks the part...


I even have some brick cylinders to keep as souvenirs...

With the hole done, I focused on getting the waste pipes cut to size and fitted. 


You may see a nice attachment where the pipe meets the wall - these allegedly give an airtight seal but I'm not convinced. Looks better than a load of silicone though. The instructions were funny (if potentially a bit sexist)...

Meanwhile inside, Dad got the copper pipes cut to size before we soldered and fitted them into place.


Last thing to do was to test the pipework. Apart from getting sprayed where a nut I forgot to re-tighten was, the copper pipes worked perfectly. The flexible pipe that we reclaimed for the tap leaked, but this was old and wasn't able to fit the tap anyway so not an issue.

Couldn't test the waste pipe because I'm still awaiting an adapter for the bottom of the plug hole to change the 32mm screw thread to a 40mm thread. It's one of those parts that, if I had a trade account, I'd have in 10 minutes and it'd cost a third of what I had to pay on eBay. 

Everything else is ready though, even the bit of flexible waste pipe to get around the misalignment issue.

While we had been testing the copper pipes, Dad discovered the rubber seal underneath one of the kitchen cabinets. I swear we looked under them at least 3 times! But at least I could put the tap back on the sink and finish getting it all flush. Tap handle still needs angling appropriately but here's how it now looks...


Looking at it, you wouldn't think it'd take 2 days, yet here we are.


Saturday, 22 April 2023

Finishing the kitchen sink

Today started with planning. Specifically, finding a tap for the kitchen sink. We wanted one with a spout that maximised the height above the sink, that was operated by a lever that is above the spout.

The lever position is important. If you don't turn it on from above the spout, then you're having to reach under the spout to turn it on. Which, if you're half asleep, ends up giving you a soggy arm.

Tracy wanted a detachable nozzle on the spout - but these seemed highly prone to leaks. At least, they were prone to leaks in the price range we were looking at. I'm sure if I spent £100 on a tap it may be better quality.

There's also only cold water into the kitchen but I couldn't find a suitable tap that did only cold water. So we had to choose a mixer tap and then find a way to block off the hot pipe.

So after an hour of perusing options (yes, I did create an evaluation matrix) I ordered the stuff from my local DIY shop and headed on over. I'm sure they've been missing me after a few weekends doing other stuff!

When I got home I did a ridiculously overly-enthusiastic unboxing of my "haul" for the offspring. Just like the YouTube videos they watch. Firstborn wasn't impressed but secondborn loved it, she even joined in presenting the items!

I digress, sorry. Back to all the problems challenges...

First thing was that the tap was 2mm too wide for the hole in the sink. So that was another trip to the DIY shop to get a new tool. One that could file down stainless steel using the power of a drill. Et voila -


Must have taken around an hour to enlarge the hole. It took forever. Really should have worn ear protection too. My ears were ringing for the rest of the day and every time I moved there was a wooshing noise. Very strange.

Getting back to the DIY, the worktop now needed a hole. A hole perfectly in line with the sink hole. You can see where this is going already, can't you!


Yep, hole was a millimetre out but it was also too small. I'd used the width of the bottom of the tap as the necessary hole diameter but completely failed to realise that there were attachments on the underside of the sink to allow for. So now we needed to make the hole a whole 20mm wider.

Dad had an ingenious idea to make accurately and neatly cutting the hole easier. He repurposed the ringpull off a (empty) tin of soup to create a height difference between two drill bits. 


The smaller bit (used for the original hole) acting as the pilot. And thus this creation was born:

This worked really well. Then it was just a matter of adjusting the hole slightly to get the alignment perfect. We used our new rotary file - it made much quicker work of the wood than it did the steel (to the surprise of nobody).

Then there was some faffing because the mounting bracket of the tap had some plastic bits that hit the worktop, so the hole needed to be distorted in such a way that the sink sat flush on the worktop. With the aid of a ring of play-doh to identify where the bracket was contacting the worktop, the nice round hole became this monstrosity:


But it works, that's the main thing.

Next up, I fitted the blanking plug to the other tap hole on the sink. Completely failing to notice that this would also require a hole in the worktop. Boom:

That one was easier.

I then went to fit everything together and fit it all in place. And it was at this point that I realised that a rubber washer from the tap assembly had gone missing. We spent a good 40 minutes looking for it. At 20:30 the search was called off; too exhausted and hungry to even bother tidying up. 


Sunday, 2 April 2023

Sunday DIY

Welcome back. Are we sitting comfortably? Excellent, let's begin...

Firstly, the secondborn spent her first night in her new room. The firstborn had a sleepover in the new room too. The verdict was that the room was warm, comfortable, quiet but too dark. I guess she's used to the light pollution from the street lights. 

Secondly, Tracy and the offspring had gone out yesterday to pick up furnishings for the new room. Tracy spent the day assembling these, which didn't go together as well as normal. She found that some of the dowells seemed too long and that the alignment of the holes seemed off. Not this places usual quality but they came together eventually and you wouldn't know any different now.


Thirdly, while Tracy was busy upstairs, Dad and I cracked on with the kitchen door. The third door section was attached to the other two. Some adjustments were needed. The biggest of which was some 5mm of wood needing to be removed from the lower side of the door to get it into the frame. The frame being narrower at the bottom than the top. It took a few attempts to get it fitting perfectly but we got there in the end. We now have a functional door!


Albeit no door handle, any latch to fasten the single door in place, and still requiring the drop bolt to be fitted to the middle door to hold it shut...


Little bit of sanding required to the frame to stop some slight rubbing. Then, of course, there's the staining and varnishing to go over again where the door shape was adjusted.

Fourthly, the last thing to do was to shorten the bedroom door from the loft. I was glad to have help getting that beast of a door all the way downstairs and into the back garden where I was doing the planing. Chopped a good bit of door off. I didn't want to have to repeat the trip! Took a bit of time to get the cut square (because of the awkward angle I had to work at) but it was worth it. Fitted perfectly at the first attempt. Again, just need to paint where I'd chopped to prevent moisture getting in and making the door swell.


And that's it. I'm now coated in sawdust and need a good shower but it's been worth it. Some good tangible results from this weekend's efforts too and I'm grateful for the help. 

Saturday, 1 April 2023

Saturday DIY

Hello and welcome to another installment of "making a house a home". In today's episode, the secondborn gets a surprise and the beloved wife has her kitchen edge closer to completion.

[Title Sequence]

I start the day in the loft. Curtains are fitted to the windows. Windows that are ever so slightly different heights!


I also discovered that my 20 year old digital radio had been broken. A child, allegedly the thirdborn, allegedly fell into it. Neither child one or child two felt a desire to grass up the littlest sister. Something tells me I'm not getting the full story. My radio is now aerial-less.
I remember being so excited to get this radio. I could finally listen to BBC 6 Music. It still has station names in it's memory from back then. Stations either long gone or from my various moves around the country. I'll be sad if I can't get it patched up somehow.

So even though I didn't much feel like being nice at that moment in time (I have too much emotional attachment to inanimate objects) the secondborn's bed was brought up to her new room, much to her approval.

[Segway into working in the kitchen]

A little later on, Dad arrived and we finally got to tackle the kitchen doors. We had put these on pause last year. Probably around October. I should probably go back through this blog and find the exact date. That would be showing the proper respect to you, my dear reader.

13th November. There, I did that just for you. Four and a half months ago it was, that we put the doors on the back burner to concentrate on fitting the kitchen and decorating the loft.

Well today was the day that we put the plan into action. I'm sure you remember what that was, yes? Just in case you don't, the short version is that the doors would need bits cutting out of them for various fixings and the instructions were practically none existent.

Meet our main workaround for apparent contradictions in the design of this door frame; recessing the pivot bracket at the top of the door and associated chamfer:

The bottom pivot caused a lot of trouble but explaining that is going to be difficult to explain without diagrams. The bracket on the bottom rail (where the bottom pivot pin is slotted) couldn't be adjusted whilst attached to the rail. So it had to be attached to the door first but this meant the alignment of the door couldn't be carried out in-situ. It had to be taken off, adjusted and put back on. Everyone likes trial and error when each attempt involves finicky fixings and lugging around a large door, right?!

Nevertheless, we got there in the end and the middle of the three doors was then attached.


That's all we had time for today. See you tomorrow for another action packed episode of "making a house a home".

[End credits]


Sunday, 26 March 2023

Loft Decorating, Episode 13.5

I managed to get an hour today to finish off the carpet. 

The bulge that I referred to yesterday mostly went away after being stretched.


However, I couldn't get the carpet to stretch enough to make up for my cutting it too aggressively down one side. You can see it in the above pic, down the left-hand side. Ended up stapling it. It doesn't look good and I've probably ruined the longevity of the carpet but I didn't know what else to do. I didn't want to leave it completely unattached as that felt like asking for trouble.


Then I reattached the door. It fits and can close but could probably do with 2 or 3 millimetres taking off the bottom to make the movement easier.


Once the curtains are up, we can begin the big move. Getting children numbers 2 and 3 into here, getting us moved into the room they move out of and then the stuff stored in the living room can move up to room we moved out of. At which point, the massive logistics operation that started a year ago will finally be complete!


Friday, 24 March 2023

Loft Decorating, Episode 13

We left yesterday with most of the underlay down. Much like I did today, let's get straight back into the action.

The remaining but of floor was cleaned up. I noticed that one section of the floor was particularly uneven:


So I did some testing. It could be felt through the underlay but not through the carpet:


Whizzed through the penultimate run of underlay. Albeit with an interesting way of keeping the carpet out of the way:


Then had to stop and think how I wanted to do the last little bit. I settled on sticking to the same direction to keep the known straight edges together. This meant more wastage and having to cut upside down but I think the finish achieved was much better:


Then came the moment I'd been dreading, unrolling the carpet. This time, I knew how it had been wrapped and knew that moving it once unfurled by anything other than a centimetre would be a severe pain / cause a severe pain. So I tried to get it lined up and unroll it where it needed to be. So this is what that looked like:


You can see the crease in the carpet where the roll has bent during manoeuvres but the technique worked well and, much to my surprise, the job was done in just a few minutes.


Compared to last time, I had far more energy (but not much time) left to stretch out the carpet, trim the edges, stretch some more and get it all into position. There was some awkwardness that I'm putting down to the walls not being square.

I got sooooo close to finishing but ended up running out of time. One end of the room is pretty much done:


Just got to work on the other end where there's an awkward wrinkle that I'm not sure how to solve without causing the big crease down the middle of the carpet to reappear. Excuse the dodgy phone-drawing but it's like the carpet has stretched on one side and is now shaped a bit like this:


Hopefully I can just continue to stretch and trim the carpet so that it reaches perfection. You should just be able to see the wrinkle in this final picture - look along the top skirting board for where the carpet seems to bulge:


Thursday, 23 March 2023

Loft Decorating, Episode 12

Long day today. Trying to put some thoughts in order but I just want to sleep.

So, an eternity ago this morning, I gave the woodwork a second coat of paint.


While that dried, I fitted the last two handles to the kitchen cupboards.


However, my heavy arse broke the step I was using as a seat.


So I headed back upstairs and upstairs again to the loft. Gave the woodwork a third coat of paint.


While that coat dried, I tidied up the landing so that all the crap from the floor of the bedroom could be relocated.

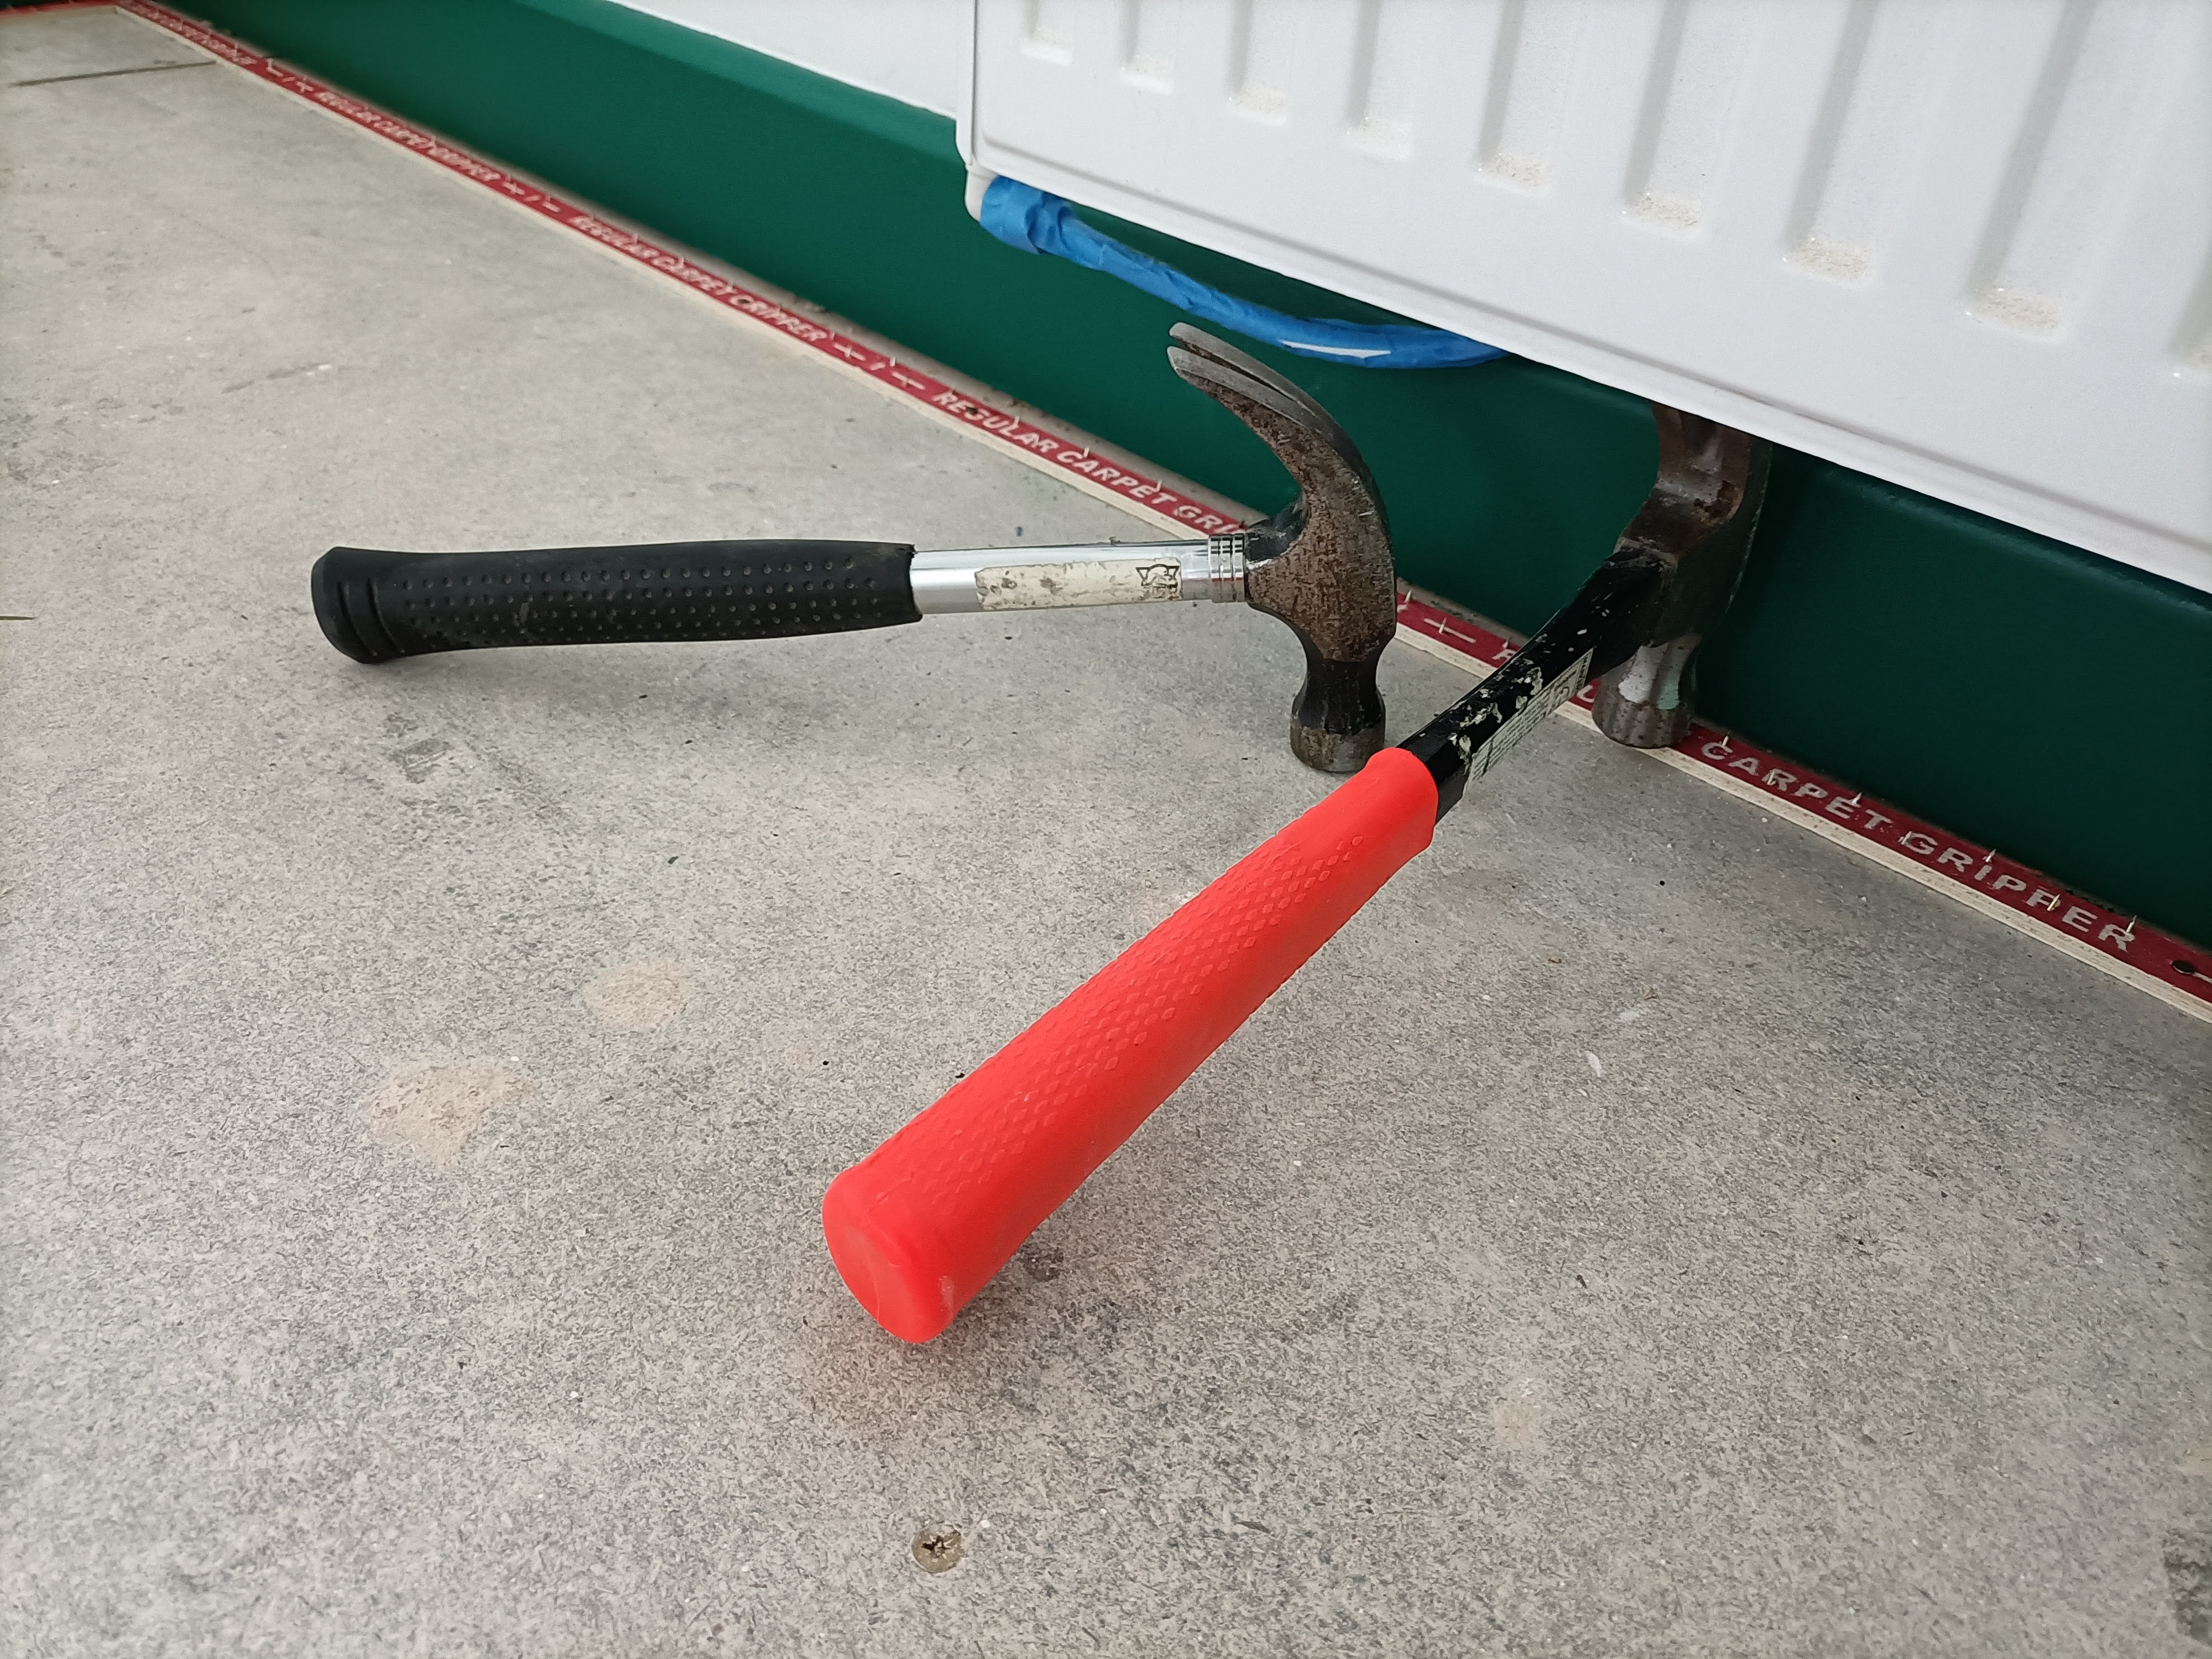
With the extra space, there was now room to fit the rest of the carpet grippers. I found a way of hammering the nails in underneath the radiator. One hammer was held just above the nail and a second hammer smacked the first into the nail. Bit fiddly to get under the radiator pipes, but got there in the end.


So then I needed to move the massive roll of carpet to allow fitting of the underlay. Glad nobody needed to use the stairs:

Before I could fit the underlay I needed to get rid of the lumps of glue and plaster strewn over the floor. This took a lot of scraping, sweeping and hoovering.

Nevertheless, got the first run of underlay down...

And a second run...

This is where I left it for today. Body needs rest. I feel good about the progress. Carpet will be painful but should have most of the day to deal with it.